General Frequently Asked Questions
Administration and Transferring software licenses
- I am having trouble with the new user-rental licensing of Valentin-Software (PV*SOL, T*SOL, GeoT*SOL).
- I can't add a user to a license due limit reached with the new user-rental licensing of Valentin-Software (PV*SOL, T*SOL, GeoT*SOL).
- The program is stuck in perpetual mode indicating the maintenance has expired despite paid for switch/renewal.(PV*SOL, T*SOL, GeoT*SOL).
- The user invitation is in German language with the new user-rental licensing of Valentin-Software (PV*SOL, T*SOL, GeoT*SOL).
- The program or administrator login won’t accept your email name or password with user-rental licensing
- Synchronising expiry dates of multiple user-rental licensing of Valentin-Software (PV*SOL, T*SOL, GeoT*SOL).
- How do I transfer my perpetual license of Valentin software (PV*SOL, T*SOL, GeoT*SOL) to another computer?
- How do I transfer my old settings and projects for PV*SOL from one computer to another?
- How do I transfer my license of HorizOn?
- How do I transfer my license of Meteonorm?
- How do I transfer my old settings and projects for Kesa aladin from one computer to another?
General Questions
- How do I create and send a screenshot?
- What is the Solar Site Selector?
- How do I print replacement acetates for the Solar Site Selector?
- How do I measure a roof pitch when on site?
- Is it possible to import horizon files into PV*SOL or T*SOL? Which tools are compatible?
- What time base is used with the simulation programs?
- Specifying locations with postcodes or coordinates
Further Software Administration
- Can I use two machines with a sinlge user Valentin-Software license ?
- Can I use my own company logo in the project report?
- What capabilities and limitations do the demo versions of Valentin software programmes have?
- Do older versions of Valentin software have to be deleted before new versions can be installed?
- Is Valentin Software accredited by the MCS or SAP?
- Can licenses be loaded centrally on my server?
- What are the system requirements?
- Can Valentin programmes also be used on Apple Mac computers or Linux systems?
- How can I change the currency units in the program into Euros or another currency?
- How do I license older Valentin programs (pre-2016)?
Climate Data
- Which climate data files are delivered with the software, and what is the source of the data and the historical period upon which it is based?
- Is it possible to use my own climate data?
- After the climate data has been installed it is not shown in the program. What should I do?
- How do I delete old custom climate locations?
- Is it possible to view the climate data?"
- How can climate files be used from other specific sources like 'MCS', 'Solar-GIS', 'NASA' or 'PV-GIS'?
Technical Issues
- The program help is not displayed under Windows Vista and Windows 7
- After starting the simulation, a message appears that the wPDF200A.dll file is not available. What can I do?
- I got the message "The operation timed out" or "the time limit is reached" when downloading a new software release through the automatic update process. What does this mean?
- Upon starting or running a program download, I get a Windows incompatibility message ?
Administration and Transferring software licenses
-
I am having trouble with the new user-rental licensing of Valentin-Software
For trouble-shooting Valentin-Software licensing issues, press your 'F1' key in the program's licensing dialouge or click the '?' icon. The following on-line resources are also very useful:
FAQ page which provides answers to the most frequently asked questions about this.
The Licensing Help Pages (example PV*SOL) which is part of the program's own help menus.
You may transfer and control licenses and assign further adminstrators via the License Manager portal which you originally receive an invitation for.
Two useful tutorial videos:
- License user
- License manager
The new user-rental licensing only applies to activating 2025 program versions. Previous program versions are managed by self re-activation. You can download the latest program versions in trial mode via the 'Contact Us' page of this site.
if there is a message that 'License Verification failed' it may be temporary. Otherwise click on the two indicated links and make sure your Firewall settings allow them to pass. You can also try a different Internet connection such as Wi-Fi versus fixed line or tether via a mobile. You can also try another computer.
-
I can't add a user to a license due limit reached with the new user-rental licensing of
Valentin-Software (PV*SOL, T*SOL, GeoT*SOL).
This often occurs when a new license was purchased after the previous of the same program type has expired. A user can not be simultaneously activated for the same type of license. Use your license administration manger portal to identify pre-existing program activations and be sure to check the ‘Inactive or Expired’ filter’ for those that have previously lapsed. It is then possible to assign the user to a new license.
Back to top
-
Synchronising expiry dates of multiple user-rental licensing PV*SOL, T*SOL, GeoT*SOL).
There is no simple way to synchronise expiry dates. The workaround is to buy a sequence of 3-month licenses of one until its renewal aproximates the bulk of the rest of them. Thereafter renew them all as 12-month licenses togethner.
Back to top
-
The program is stuck in perpetual mode indicating the maintenance has expired despite paid for
switch/renewal. (PV*SOL, T*SOL, GeoT*SOL).
After purchasing switch or renewal, the license has to be first administered in the Licence Manger and allocated to a particular user. The user has to be invited and then verify their email. The user then has to download the latest program trial versions and select the ‘User license’ so as to log on with their email/Password. If these steps don’t work it is recommended to try again with a different emails address and/or computer.
Back to top
-
The user invitation is in German
There is a choice of English or German language for the 'Send Email' invitation for a new License User. Use the drop-down box at the top of the dialogue to choose this. It says 'Invitation as License User ....' with a down arrow symbol. In any case the invitation body text can be fully edited to your choice.
Back to top
-
The program or administrator login won’t accept your email name or password with user-rental licensing
Always start with accessing the online license portal and if you have any old retired licenses, make sure you've first removed any users attached to them as found under the Inactive licenses tab.
Also make sure any other listed users for each active license in the online license portal have closed their program to allow others to log on. Use the envelope symbol to the right of each listed email name to invite them to make sure they have been initially verified on the system.
You can add duplicate name/emails on multiple licenses but they can only be active on one at a time. It is also possible to add back-up email address to retain program access as a contingency.
To the far right of the licensing portal screen, there is a tiny 'Manage Users' icon and you can add/remove/active/re-active users via that.
To the far right of the licesning screen, there is a tiny 'Manage Users' icon and you can add/remove/active/reactive users via that.
In the case a password is forgotten, there are links to ‘Forgot password’ during the access process. In the case of the Administrator forgetting a password, access is required to the original email given. If all fails, Contact Us.
Back to top
-
How do I create and send a screenshot? (this is useful for our technical team in identifying
issues
and answering queries)
You can use the Windows 'Snipping' program to capture and save a screenshot. Or for most computers, hold down 'Ctrl' and press 'Print Screen' on your keyboard. Sometimes the pressing of the 'Ctrl' key is not required.
For pasting the captured image, hold down 'Ctrl' and press 'V' together on your keyboard to paste the screenshot directly into an open email.
Or if you wish to first edit the image then open up Microsoft 'Paint' found on most computers by clicking Start>Programs>Accessories>Paint.
Alternatively, save the image as an image file on your computer and attach it to an email.
Back to top
-
What is the Solar Site Selector?
This is a site survey tool which uses a sun-path acetate to display relevant annual sun-path curves with respect to latitude, azimuth and angular altitude. The local terrain silhouette can then be drawn freehand on the acetate. This data can then be transferred into T*SOL or PV*SOL software as 2D shading data. For more information click here
Back to top
-
How do I print replacement acetates for the Solar Site
Selector?
Because all printers and graphic software is different, we cannot prescribe any one method or scale to use for printing acetates. We suggest you do a few trials using just white paper adjusting the print size via whatever software you normally use to print graphics. Most PCs have Microsoft Paint as a free program which has a 'Resize icon in the menu.
Back to top
-
How do I measure a roof pitch when on site?
This can often be measured directly on site with an inclinometer (see our Survey Tools)
If this is not possible, the alternative method is to use trigonometry, whereby the roof pitch angle can be derived from two measured distances on the building - often the height and horizontal distance from the point of measurement. The relevant trigonometry equation is then Tangent*(pitch angle) = height/distance.
There are many useful resources on the Internet to help understand and use trigonometry. We offer training courses on this subject.
Back to top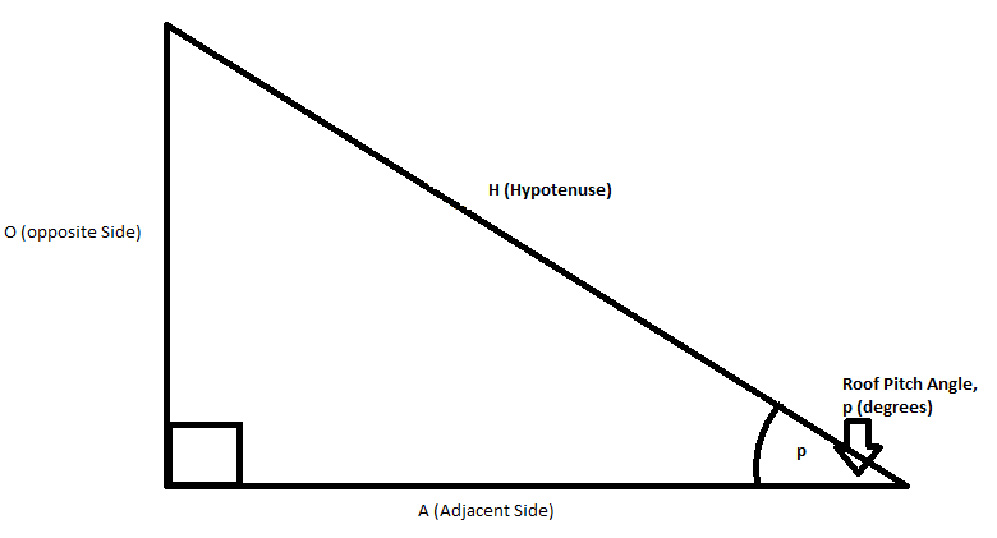
-
Is it possible to import horizon files into PV*SOL or T*SOL? Which tools are compatible?
Yes, you can load 2D horizon files in the shade window by using the import function or just paste directly into the 2D shade table. Many third party devices/software create such data which is of the form of two columns representing the terrain outline - azimuth and angular altitude. Sources include: PV-GIS, Horicatcher (Meteotest), Horizon (Panorama Master), SunEye (Solmetric). The data is essentially exported and edited as two columns of azimuth/bearing and angular altitude. The headers are removed and the numbers formatted without decimals. The ‘bearing’ format is required so if the Hz angular data is shown as azimuth then it must be converted to ‘bearings’ by adding/subtracting 180 degrees. The two data columns have to be finally saved as one column of text with a single space between each pair with the filename suffix *.hor. This will now directly import into PV*SOL & T*SOL.
The following download is a spreadsheet with example data and further instructions Instructions%20for%20export_import%20online%20terrain%20V%201.4.xlsx
Back to top
-
What time base is used with the simulation programs?
Using the graphic feature, the daily height of the sun can be plotted to identify the zenith. It can be seen that the time of the zenith varies according to the longitude and it is not always at midday within the time zone. For example across UK the solar 'noon' can vary by over 30 minutes. Across central Europe by over 2 hours. The climate file chosen for the simulation set the longitude and time zone of the location according to UTC. Any other imported data such as appliance usage should be adjusted to synchronise to this climate file's time zone without applying any daylight savings.
Hourly values are designated by the end time of the interval. Thus the value for 14.00 hours refers to the average value of the interval from 13.00 to 14.00 hours.
Back to top
-
Specifying locations with postcodes or coordinates
There are several online tools to convert location addresses to postcodes and grid co-ordinates.
For example https://gridreferencefinder.com/
Postcodes can represent a large area and it is often more accurate to specify with coordinates to 6 decimal places. These can be used to set climate locations and map import features or explore a local area possible with Google Earth Pro and StreetView Maps. The full address can then be shown in the reports using the relevant text fields or as an addendum in a Word editor.
Back to top
Further Software Administration
-
Can I use two machines with a sinlge user Valentin-Software license?
A single-user license cannot co-exist on two computers at the same time. If it was tried, then it would flag an error since the licensing server in Germany is checked at each start-up. From 2025 the program versions are available in user rental mode with a License Manager portal which makes changing licenses aroundmuch easier.For the old perpetual licenses, and if the licensed machine is kept at base, then VPN and Windows Remote Desktop can be used from the other machine. But in this case the graphics in 3D can become variable depending on the mutual graphic adaptors and is not officially supported.
In any case a single laptop can be used between two places or different people. But if you don’t want to carry laptops around then best to use the License Manager or you can buy more licenses. The machine that is not activated will return to trial mode or not function at all if over 30 days trial. Further details of transferring licenses can be read here: Transfer licenses
-
Can I use my own company logo in the project reports?
For all programs it is possible to place the results into a Word document and add a logo. In some programs like T*SOl and PV*SOL you can import the desired logo directly into the program project report options.
Alternatively, the report can be exported into Microsoft Word and further customised there.
Back to top
-
What capabilities and limitations do the demo versions of Valentin Software
programs have?
Free demo / trial / test versions can be downloaded from our website Contact Us section. With these, for a limited period you can view the key program components and features and run simulations. However the customer report will be watermarked. You can also use the program help to obtain an overview of the content and capabilities of the program.
After the test period has expired (typically one month) you will no longer be able to access the program. You can get a further trial periods with another program version but not for the same version.
If your trial period has expired then we occasionlaly run free webinars or have recordings of previous ones. If you have particular features you want to appraise then you can ask for a short pre-sales online demonstration or there may be a tutorial video available.
Back to top
-
Do older versions of Valentin software have to be deleted before new versions
can be installed?
Old versions can often be left on the same machine. But if there are problems or confusion with the new program version it may be worth deleting old versions.
Back to top
-
Is Valentin Software accredited by the UK's MCS or SAP?
In short no. In detail, as of spring 2023 there is no advertised method provided under the MCS scheme to accredit commercial simulation design software to provde results according to the format of the MCS standards. Those standards change from time to time. The programs PV*SOL, GeoT*SOL and T*SOL have been widely used by industries across the world for decades and are specifically supported by major international brands who provide data for the products shown in the program databases. These programs are adapted by each user to each specific location and application and all provide temperature analysis as well as voltage/current/power configuration (for PV*SOL). In particular PV*SOL can be used for detail design of medium/large scale PV arrays greater than 50kWp DC which the MCS standards do not cover.
When considering the performance prediction in simple annual energy yield, the values between the MCS methods and commercial methods will inevitably be different not least as the input values are similarly different. In summary for PV, the MCS PV Guide method only gives a very limited performance prediction for certification purposes not intended for professional design of systems. Whereas PV*SOL anticipates a wide range of variables such as for large-scale arrays or battery systems which are outside the remit of the MCS.
For further verification, the following paragraphs are taken from the Microgeneration Certification Scheme documents that underpin much of the government's renewable subsidy scheme.
Microgeneration Installation Standard: MIS 3002 Issue 3.3 REQUIREMENTS FOR CONTRACTORS UNDERTAKING THE SUPPLY, DESIGN, INSTALLATION, SET TO WORK COMMISSIONING AND HANDOVER OF SOLAR PHOTOVOLTAIC (PV) MICROGENERATION SYSTEMS 4.3 System Performance
4.3.3 Additional estimates may be provided using an alternative methodology, including proprietary software packages, but any such estimates must clearly describe and justify the approach taken and 4.3.4 factors used and must not be given greater prominence than the standard MCS estimate. In addition, it must be accompanied by warning stating that it should be treated with caution if it is significantly greater than the result given by the standard method.
Microgeneration Installation Standard: MIS 3001 Issue 4.2 REQUIREMENTS FOR CONTRACTORS UNDERTAKING THE SUPPLY, DESIGN, INSTALLATION, SET TO WORK COMMISSIONING AND HANDOVER OF SOLAR HEATING MICROGENERATION SYSTEMS 4.5.5 Be accompanied by an estimate of annual energy performance calculated as follows:
Additional estimates may be provided using an alternative methodology but any such estimates must clearly describe and justify the method employed and the factors used. These additional estimates must not be given greater prominence than the estimation method specified in this standard and shall not be used on the MCS certificate. In addition, it must be accompanied by warning stating that it should be treated with caution if it is significantly greater than the result given by the standard method.
For non-domestic installations and Solar Heating Systems outside the scope of SAP and MCS 024:
Calculate the annual solar energy input to the system using proprietary software. The software package, version number and all simulation inputs and outputs should be fully communicated to the client at or before the point that the contract is awarded. All input assumptions must be stated and must be appropriate to the installation.
The following paragraph is taken from SAP 2012, the important part highlighted in bold:
"For SAP calculations dwellings have a standard occupancy and usage pattern, which are typical values of quantities that in practice vary substantially between dwellings of similar size and type. The occupancy assumed for SAP calculations is not suitable for design purposes, for example of hot water systems."
A quote taken from the MCS Complaint and Quality manager in 2025: “PV*SOL is compliant and satisfies the MCS perspective. MCS standards require all designs to take in consideration the shading effect on each array communicated to the end user in such a way as it is easily understood.”
Back to top
-
Can licences be loaded centrally on my server?
In short no but from 2025 the new user-rental licensing makes managing easier. Single-user licences are intended for use on an individual workstation. This means there cannot be simultaneous access to projects from other machines. However, the program on each workstation can be set so its databases and projects are stored at a single server location, hence allowing sequential access to stored projects by other licensed holders.
To note saved projects contain all the necessary design data so it is possible to store active projects folder via a server. The default for this can be set via Main Menu > 'Options' > 'Program Options'
Saved projects can only be sequentially accessed by users, and not simultaneously i.e. not in parallel.
Remote access to a licensed machine such as via VPN and Windows RDA is often feasible but not fully supported.
Back to top
-
What are the system requirements?
For information on system requirements click here
-
Can Valentin programmes also be used on Apple Mac computers or Linux
systems?
Valentin software is developed to run on Windows operating systems. Additional software is likely required, such as VMWare or VirtualPC, in order to use Valentin programs on a Mac or with Linux.
Please note that ourselves nor Valentin Software don't provide support for Mac or Linux installations but we are aware of many users who use this method. Free trial versions are sometimes available of these products to establish compatibility.
Back to top
-
How can I change the currency units in the program into Euros or another
currency?
The unit of currency in the programme depends on the system settings in your PC.
You can change the currency setting for your operating system in the system settings (depending on the operating system version, you can do this typically under Regional and Language Options or under Country Settings).
For example with Windows 7 click on Start > Control Panel > Clock, Language, and Region > Region and Language > Additional Settings > Reset > Yes > OK > Apply > OK
Back to top
-
How do I license older Valentin programs
(pre-2016)?
To license some older programs after a re-activation request, follow the instructions on the following document: Valentin_software_legacy_program_registration_1.0.pdf
Back to top
Climate Data
-
Which climate data files are delivered with the software, and what is the
source of the data and the historical period upon which it is based?
All current Valentin programs come with the same initial selection of climate data files. In addition, most versions of the programs include the climate data generator MeteoSyn, which can be used to create additional climate data files including of your own source providing it is in monthly format. Further hourly climate files can be directly imported.
The source of the weather data is often indicated in the PV*SOL climate data database and this varies across the world. Where no reference is obvious, this is normally a data set from Meteonorm in Switzerland. PVGIS or NASA data is sometimes also used. Where original data is in monthly format, MeteoSyn uses an algorithm to produce hourly values using a mathematical model called INSEL.
The historical period of data collection or observation varies but is almost always an average taken over a time-span of at least 5 years. For prediction into the future, long-term historical averages tend to be more reliable.
Back to top
-
Is it possible to use my own climate data?
Yes, this is possible if it is in monthly format in the current versions of PV*SOL and T*SOL. You can also directly import hourly data if in the format of WBV, DWD or Meteonorm (*.dat) See more about *.dat files via this downloadable document: FAQ: Importing a *.dat climate file .pdf
Back to top
-
After the climate data has been installed it is not shown in the program.
What should I do?
If the program is still in demonstration mode then you may not be able select other climate files. Check under the Help menu for whether it is fully registered. The MeteoSyn module will also not work fully if there is no Internet connection. This may be because the connection has been blocked by a firewall.
If these do not resolve the problem, please try reinstalling the software.
Back to top
-
How do I delete old custom climate locations?
If you have previously saved projects that used custom climate files then those values will be automatically re-imported if the project is re-opened. In these cases you may wish to first open, then re-interpolate the custom climate locations and re-save those projects if there is change in PV*SOL/T*SOL version.
Any previous self-created climate data records will remain stored under a Windows folder that can be easily accessed with a right-click on the location listing in the List view of Meteosyn. This will allow ‘Show in existing folder’ were you can optionally delete those custom climate files using Windows ‘Files and Folders’. This folder is usually located “C:\ProgramData\Valentin EnergieSoftware\MeteoSyn\WBV\_userfiles\GBR” The ‘GBR’ suffix will change for different countries.
-
Is it possible to view the climate data?
The climate results can be exported via the diagram/graphics editor. Here it is possible to also output tables of hour/month/year values for 'Irradiance onto horizontal plane' and 'Outside Temperature'. In PV*SOL this can also be at minute level resolution.
Back to top
-
How can climate files be used from other specific sources like 'MCS',
'Solar-GIS', 'NASA' or 'PV-GIS'?
Manual entry of custom climate data (i.e. irradiation and ambient temperatures) is done via the monthly value import in the PV*SOL Meteosyn dialogue > Create climate data for New Location> Measurement data. To note, there are already several UK SAP climate files in the database which effectively synchronise with those used by the UK MCS.
In PV*SOL, most of the bundled climate files of hourly values originate principally from a Swiss company Meteotest but it quite possible to also make use of other datasets as well. For PV-GIS it is even easier from here. Also there is a much wider range of climate data options from our other product Meteonorm.
It is possible to convert the same originating climate data from other calculation methods into PV*SOL or T*SOL although it should be stressed this will not automatically lead to obtaining the same annual performance results. Some alternative methods use only simplistic steps to obtain an approximate annual yield estimate; whereas PV*SOL & T*SOL considers such details as efficiencies, temperature and energy analysis. In the case of PV*SOL down to a minute's resolution, along with voltage / current array configuration options. The consideration of part-load, shading and albedo are also quite distinct.
See also here: https://www.solardesign.co.uk/faqgeneral.php#comply and here https://www.solardesign.co.uk/faqgeneral.php#delivered
Back to top
Technical Issues
-
The program help is not displayed under Windows Vista and Windows 7. What do I
do?
To display the help function the Windows program WinHlp32.exe is required. Please follow the instructions from Microsoft.
For Windows 7 (32 bit) go to:
For Windows Vista go to:
Back to top
-
After starting the simulation, a message appears that the wPDF200A.dll file is
not available. What can I do?
The wPDF200A.dll file is required in order to create the Project Report in PDF format. The file is a part of Microsoft Windows Systems. Please copy the wPDF200A.dll file via the following link: http://solar-software.de/downloads/support/wPDF200A.dll and paste it into C:\WINDOWS\system32 or C:\WINNT\system32, depending on your Windows System.
Back to top
-
I got the message "The operation timed out" or "the time limit is reached"
when downloading a new software release through the automatic update process. What does this
mean?
The program needs a relative constant and stable internet connection. If this is not guaranteed, then the program aborts the download of data. You can try to download the latest program version from the download section of our webpage. Please execute the downloaded setup file. The old program version doesn't need to be uninstalled. Some browsers such as Internet Explorer handle the download process better than others.
Back to top
-
Upon starting or running a program download, I get a Windows incompatibility message ?'
For Windows 11 or 10 messages see this Microsoft page
This issue can also be resolved by using a different browser or downloading directly from Valentin-Software.
Back to top
Transferring software licences
-
How do I transfer my perpetual licence of Valentin software (PV*SOL,
T*SOL, GeoT*SOL) to another computer?
You may wish to transfer a licence because:
- You have a new PC
- Change of user
- Hard drive replacement of existing PC
- Hard drive reformatting of existing PC
When you made the original full installation you were ultimately asked to activate the program. Activation generates a unique keycode for each installation. You will not be able to make a second full installation of a licence by simply copying the same original activation keycode (even if you try to install it on the same computer). You will however need the longer serial number and ideally this should first be recorded possibly via a screenshot of the original installation under the Menu > Help > Registration. Alternatively the original email you received with the licence serial number will be required.
Before you can make a transfer, you will first need to de-activate the original install – this is different form simply deleting it. In any case you may wish to first back-up and make copies of your saved projects. You also may wish to export some program settings. Requesting a licence re-activation will discontinue support of the original (current) installation. It is therefore not a facility for attempting to duplicate licences and you should only request reactivation if you wish to transfer the licence from one computer to another.
a) Program versions 2019 onwards allow self-deactivation providing the old computer is online. Use Main Menu > Help > Registration > Change Registration to do this. Then the licence number can be used on another computer. This is limited to twice a year. If your SMA expiry date is old then you will need to ask us for a special download link for the correct version on the target computer.
b) Where self-deactivation is not possible then Click here to request a reactivation
After the request is sent you will eventually receive an email back with a download link. Ensure this is the correct trial version to be installed on the target computer you wish to transfer to and check as far as possible that it functions correctly in trial mode. If you wish urgently use or transfer a current program (i.e. not a legacy program) the current trial versions can be quickly obtained via the Contact Us page. For legacy transfer requests we will first check if you are eligible for an update.
NOTE: You will need to uninstall the original program from your PC before being able to make the new installation. Please let us know if you are unable to do this (e.g. because of theft or damage to the original PC). However if a laptop has been taken by a known user you must use all means necessary to re-aquire the laptop to de-activate the license as option a) above. In any case you should give a reason in the box titled 'Reason for reactivating' on the form. Re-activation requests without deleting the original can take much longer to complete. If you wish to copy over your PV*SOL custom settings to your new computer, please first follow this FAQ: https://www.solardesign.co.uk/faqpvsol.php#pvsolfaq_36
Please note: Old serial numbers that have already been updated cannot be re-activated. Instead you should use the new serial number that was sent as the replacement.
If you have a user-rental license, then you can transfer licenses via the License Maanger portal.
Back to top
-
How do I transfer my old settings and projects for PV*SOL from one
computer to another?
Follow this link: How do I copy over my settings, user-created database items and favourites when changing my program version or transferring my licence?
Back to top
-
How do I transfer my licence of HorizOn?
You may wish to transfer a licence because:
- You have a new PC
- Change of user
- Hard drive replacement of existing PC
- Hard drive reformatting of existing PC
From Sep 2018, the HorizON program is no longer on sale. It is not designed to work with Windows 10 and above. For support on licensing please contact the programmers directly www.energieburo.ch In any case first ensure a demo version is installed on the target computer you wish to transfer to and check as far as possible that it functions correctly.
When you made the original full installation you were ultimately asked to activate the program. Activation generates a unique keycode for each computer. You will not be able to make a second full installation of a licence by simply copying the same original activation keycode. You will however need the longer serial number and this should be recorded possibly via a screenshot of the original installation under the Menu > Help. You will need this information when you contact the programmers.
Back to top
-
How do I transfer my licence of Meteonorm?
You may wish to transfer a licence because:
- You have a new PC
- Change of user
- Hard drive replacement of existing PC
- Hard drive reformatting of existing PC
First ensure a demo version program is installed on the target computer you wish to transfer and check as far as possible that it functions correctly.
Meteonorm programs allow you to self-activate and de-activate licences but you must deactivate the first installation online before you can activate the second installation.
1) Deactivating a Meteonorm installation
- Start Meteonorm program
- Go to Help menu
- Select 'Revoke registration' and confirm
- You don't have to uninstall the residual program (which will revert to a demo version)
2) Installing and activating a new Meteonorm installation (new or alternate PC)
- Download the trial version installation via here Contact Us
- Move downloaded file to Desktop
- Run file to install program (you might need administrator rights to do this)
- Open the program (if not automatically opened)
- Activate program using the original licence serial number
3) If deactivation of the old installation of Meteonorm is impossible
If you do not have access to the original installation (for example, because the PC has failed completely or has been stolen) then follow these steps:
- Email support@meteonorm.com asking to revoke your registration
- Include your original serial number in the email
- Install Meteonorm on the new PC (see instructions above)
- Register new installation with your licence serial number
-
How do I transfer my old settings and projects for Kesa aladin from one
computer to another?
Download and follow the instructions in this document here: Kesa settings and projects transfer
Back to top